System installation
Step-by-step guide:
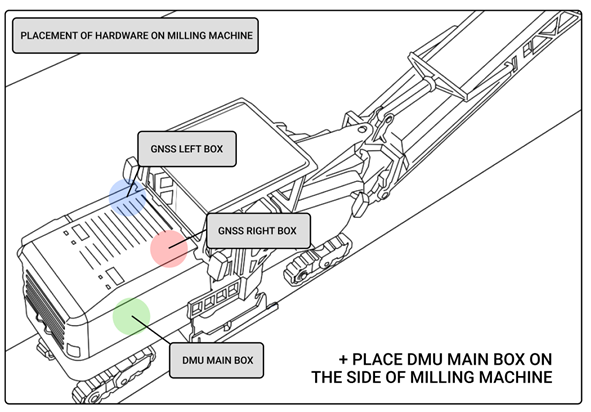
- Mount the MainBox
Attach the MainBox to the rear part of the construction machine using the magneticbrackets provided. Ensure the surface is clean and flat for a secure hold. - Connect the CAN Cable
Use the CAN cable to connect the MainBox[2] to the construction machine’s CAN bus system. Confirm that the connectors are firmly seated and properly locked. - Position the GNSS Boxes
Place the left and right GNSSBox units on the pre-marked and accurately surveyed locations on the machine (if you do not have pre-marked locations, you can use the calibration offset measuring procedure described in the previous chapter). These positions must match the defined configuration for precise GNSS operation. Tie the GNSSBox to the milling machine body, for example with a rope and a carabiner to the cutter body to secure it against falling. - Connect GNSS Boxes to MainBox
Connect the left GNSSBox[1] to MainBox[4] using the appropriate connection cable. Connect the right GNSSBox[1] to MainBox[3] using the corresponding cable. Verify that each cable is routed securely and does not interfere with moving parts. - Power On the System
Turn on the control computer by pressing the Panasonic[1] power button. Wait until the system fully boots up before proceeding with software configuration. - Wait for the System to Boot and Launch the DMU Application
Allow the system to complete its startup process. The DMU (Differential Milling Unit) application will launch automatically once the computer is fully booted and ready for use.
tip
For quicker installation, you can let GNSS magnetic holders GNSSBox[5] place on milling machine body.